Mixed-Cargo Container Planning: From Packing List to Loading Guide
Build a mixed-cargo loading plan from a verified packing list, reconcile quantities and review 3D results before exporting warehouse loading guides.
Start with the result the warehouse needs
A mixed-cargo container plan must connect the order list to a loading sequence that another person can understand. A picture of a full container is only part of that handoff. The warehouse also needs to identify each package, reconcile quantities, see which cargo remains outside the solution, and know which version of the plan has been approved. LoadVis provides result views and exports to support that review, but the input data and operational checks still determine whether the plan is usable.
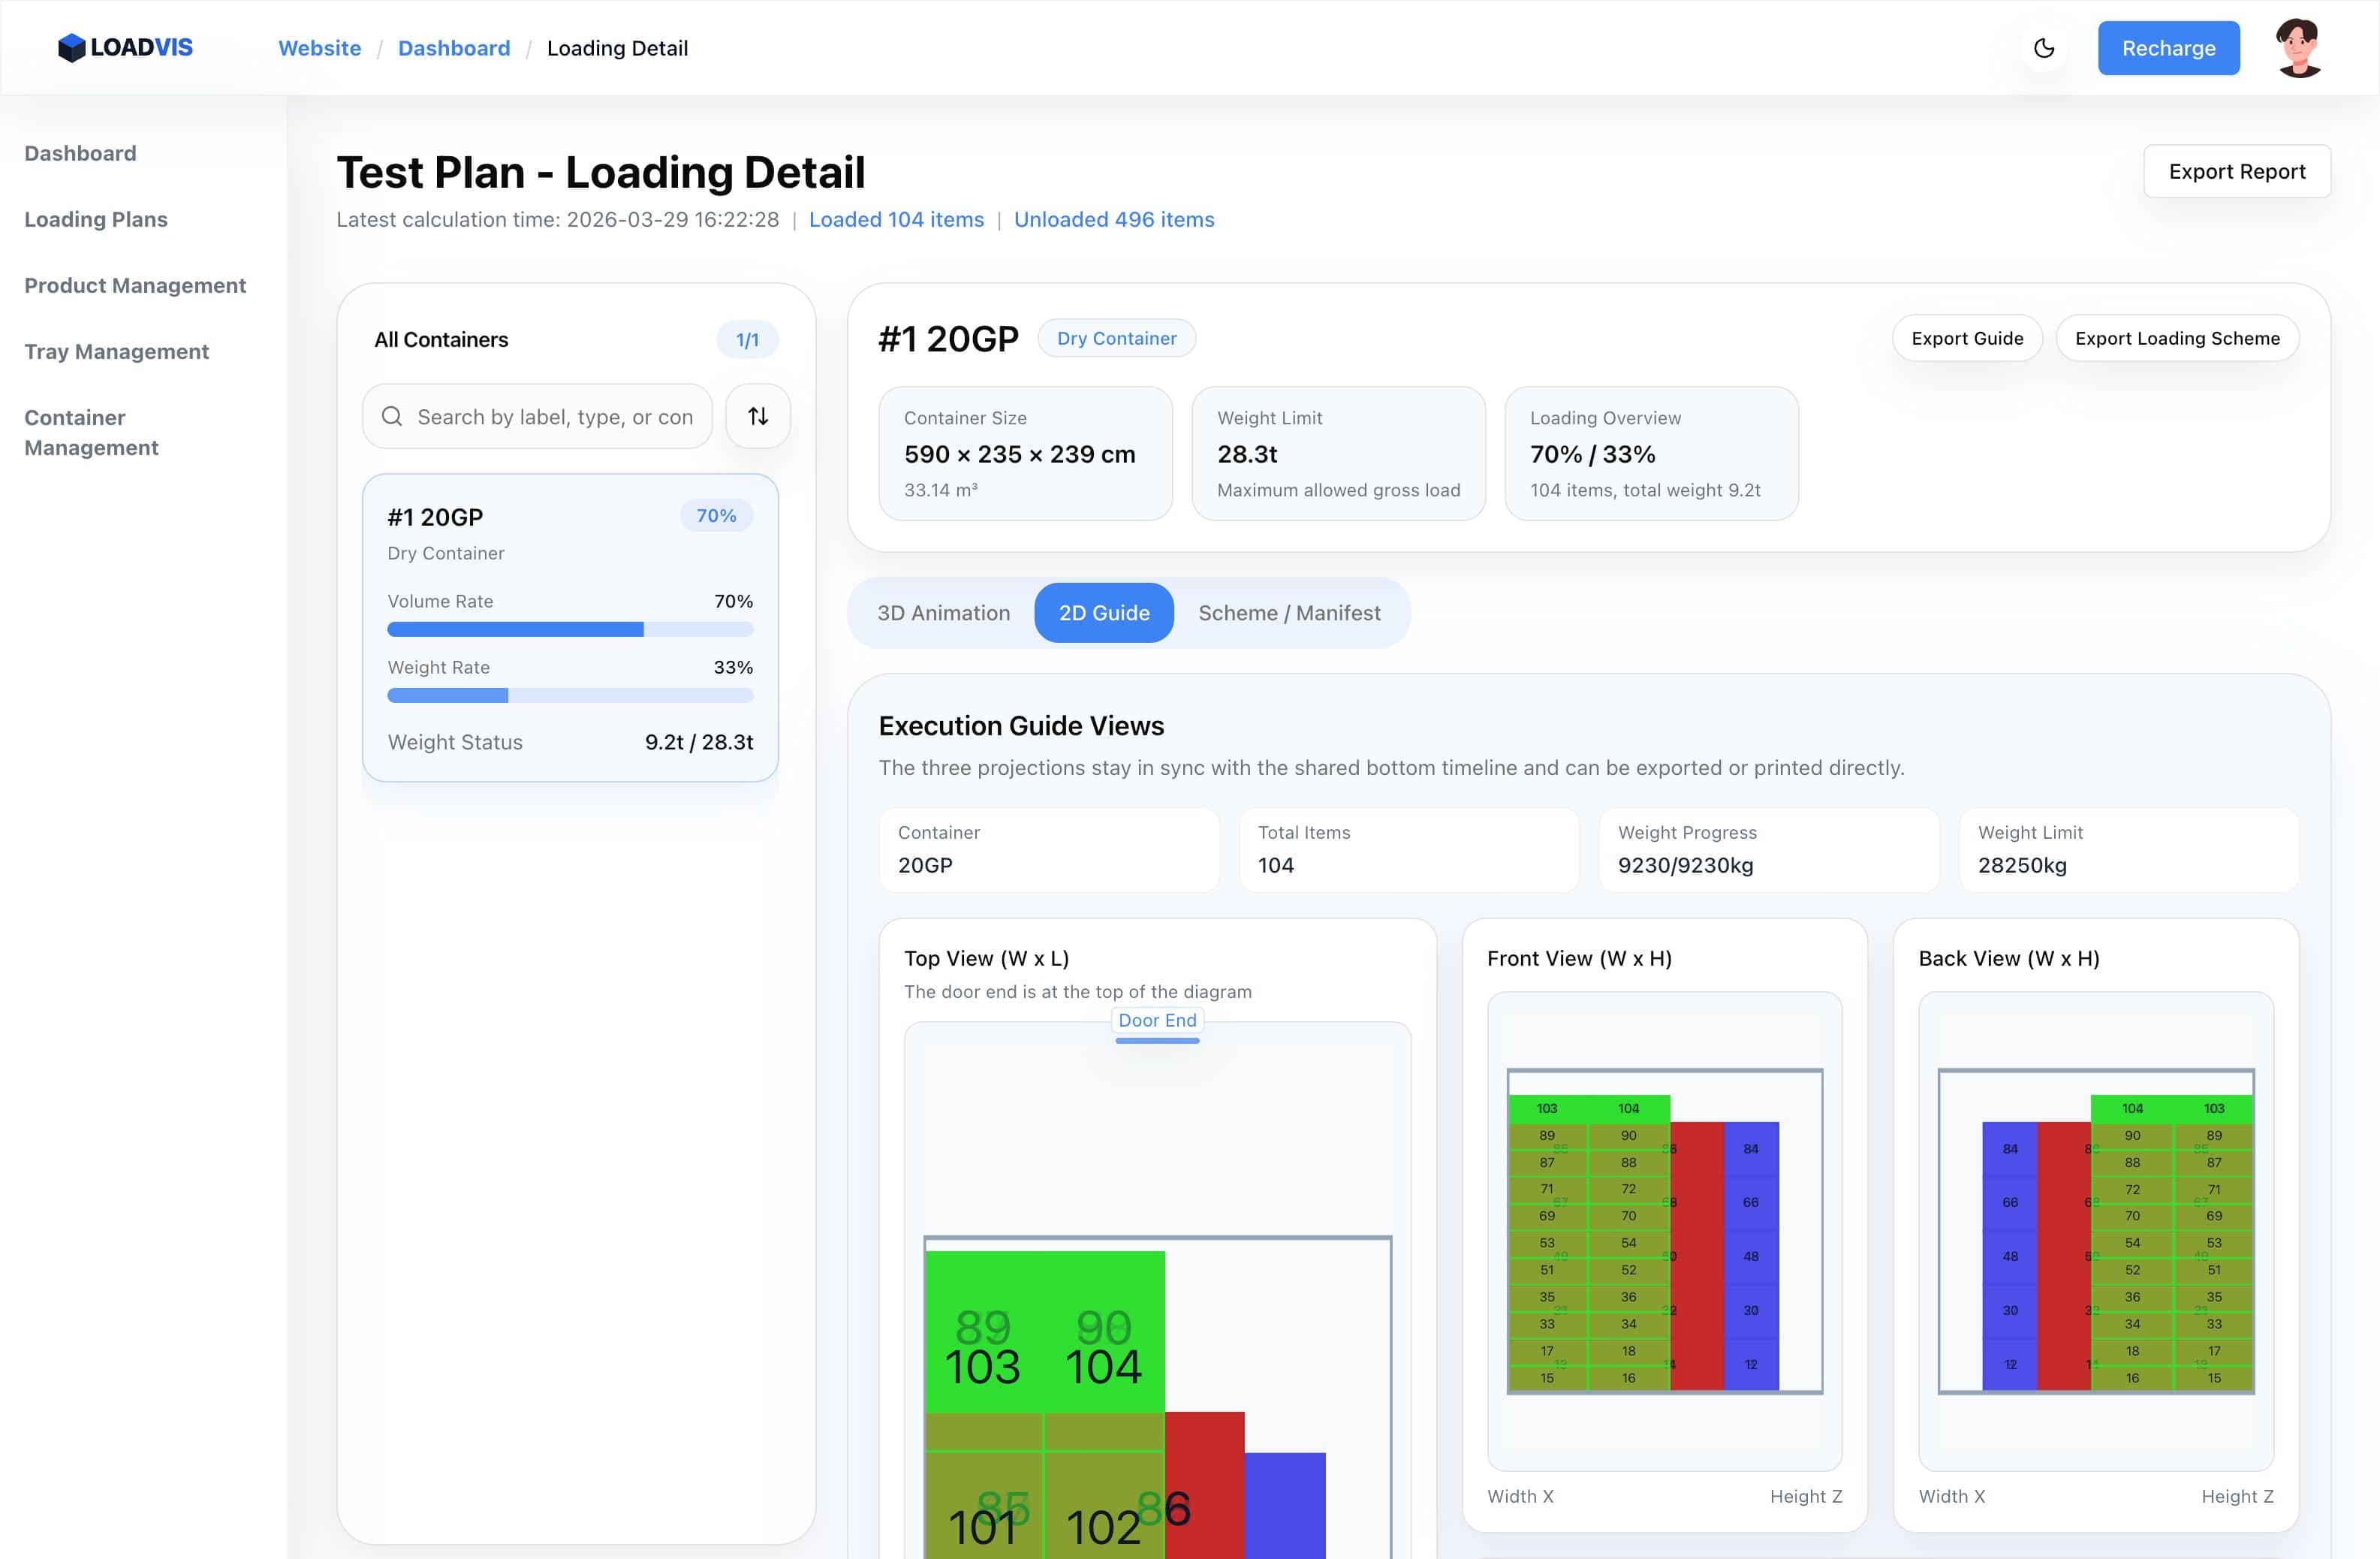
This guide follows two different kinds of evidence. A small numerical example explains how to reconcile an order and its cargo totals. Existing LoadVis product screenshots illustrate the 3D and 2D guide screens. The screenshots are demonstration data from another plan; their 104 loaded and 496 unloaded items are not results claimed for the worked example. Keeping those examples distinct avoids turning an illustration into a misleading performance claim.
Step 1: define the shipment boundary
Decide exactly what belongs to the plan before entering dimensions. Use a shipment identifier, an order revision and a planned dispatch date that the team can recognize. If several purchase orders are being combined, make the relationship between those orders and the cargo rows explicit. Keep cancelled lines, possible additions and replacement packaging outside the approved input until someone confirms that they belong to the current shipment.
A useful boundary also states how cargo is presented for loading: loose cartons, cartons already on pallets, crates or another handling unit. A palletized item is not represented accurately by the dimensions of its loose cartons alone. Include the pallet, overhang, wrapping and total height in the handling-unit record where relevant. Confirm with the warehouse whether goods will be loaded in that form or rebuilt before entering the container.
Step 2: build a cargo list that can be reconciled
For every SKU, capture a stable identifier, a description that distinguishes it on the floor, external packed dimensions, gross mass per handling unit and the number of those units. Add the operational requirements that are actually known: approved orientations, stacking limits and any compatibility or handling constraints supported by the planning workflow. If a requirement cannot be represented in the tool, retain it as an explicit review item rather than assuming the solver has checked it.
Do not merge unlike packages simply because their product names are similar. Two cartons can have the same volume and still fit very differently because their footprints differ. Conversely, several commercial order lines may share exactly the same physical packaging. The decision to combine them should preserve the ability to identify and count the goods during loading. Keep a mapping to the original packing list so an operator can resolve discrepancies without reverse-engineering the planning data.
Step 3: check a small order by hand
Consider an illustrative order with SKU A: 120 cartons of 60 by 40 by 40 cm at 15 kg each, SKU B: 80 cartons of 50 by 40 by 30 cm at 12 kg each, and SKU C: 40 cartons of 80 by 60 by 50 cm at 25 kg each. There are 240 cartons in total. This is a reconciliation example, not a claim that the order fits a particular container.
The cargo volumes are 11.52, 4.8 and 9.6 cubic metres respectively, for 25.92 cubic metres in total. The corresponding gross masses are 1,800, 960 and 1,000 kg, for 3,760 kg overall. Write those totals next to the input version. If the application shows a materially different quantity, volume or mass after entry, stop and locate the mismatch. A unit conversion, an omitted row or an incorrect per-carton weight is easier to fix before calculation than during loading.
Step 4: choose and verify the container
Select equipment based on the confirmed internal dimensions and permitted cargo mass, not just the label 20GP or 40HC. Check whether the assigned container differs from the default assumptions and whether loading hardware, insulation or other fittings reduce available space. A useful container record includes the dimensional source or confirmation date so later reviewers understand why a particular value was used.
The nominal cargo volume of the worked order is below the illustrative 20GP internal rectangular volume used by the free calculator, but that comparison does not prove a fit. Each SKU has a different footprint and height, the mixture can leave inaccessible spaces, and operational restrictions can rule out otherwise possible placements. Use the comparison as an input sanity check. Keep the actual mixed-cargo solution and its remaining quantities as the evidence for what the planning calculation achieved.
Step 5: agree on physical constraints before solving
Ask the packaging and warehouse teams which faces may be placed down, how many layers are permitted and whether one cargo type may be placed above another. Translate those answers into the supported product and plan settings. Preserve the original meaning: a maximum stack height and a maximum number of layers are related but not always interchangeable when different package heights are mixed.
State any assumptions that require a person to validate them. The planning result does not replace an assessment of packaging compression strength, cargo securing, floor point loads or the handling method. A box that occupies a valid rectangle can still be unsuitable for the proposed location. If a constraint is uncertain, resolve it with the responsible team or compare clearly labelled alternatives. Do not silently choose the most permissive setting just to improve the utilization figure.
Step 6: create the plan and calculate a baseline
In the LoadVis workspace, create a loading plan and add the cargo and container records for the current input version. Check all quantities before starting a calculation. Retain a short note describing the baseline: container selection, included SKUs and important constraint choices. That note makes the result easier to compare when a carton count changes or another container is proposed later.
After calculation completes, open the result detail and review the loaded and unloaded totals first. Reconcile them with the original input for each SKU, not only for the shipment as a whole. A result that loads the right total number of cartons can still have the wrong mix if one SKU was entered incorrectly. Treat every remaining unit as unresolved cargo, and decide whether it needs another container, a revised order or a different planning approach.
Step 7: inspect the 3D result as a review tool
Use the 3D view to understand the arrangement and play through the loading sequence. Look for the relationship between large or heavy packages, upper layers and the space near the door. Pause at points that need discussion rather than asking the warehouse to infer the entire sequence from a single final image. Relate the displayed cargo identity to labels on the packing list and the physical packages.
The demonstration result screen shows a container summary, separate volume and weight utilization indicators, a cargo label and playback controls. These are useful review locations. The screenshot does not establish that every physical constraint has been checked by software. Use it to locate the evidence you need, then compare that evidence with the approved input and the loading method. Where the diagram alone cannot answer a question, assign that question to a responsible reviewer.
Step 8: use the 2D guide to remove ambiguity
Open the 2D guide and compare the top, front and back projections. Identify the door end before interpreting a row or a coordinate. A view from the opposite end can reverse left and right, so workers should not have to guess the viewing direction. Check whether the package numbering and visible layers correspond to the same point in the loading timeline.
In the accompanying product screenshot, the guide explicitly marks the door end and presents synchronized projections alongside total items and weight progress. That combination helps explain what a printed or exported guide is representing. When reviewing a real shipment, choose a few representative steps and have a warehouse colleague describe the next placement in their own words. If the explanation differs from the intended instruction, resolve the orientation or identification problem before exporting the handoff.
Step 9: reconcile quantities with a simple acceptance equation
For every cargo row, input quantity must equal loaded quantity plus remaining quantity. Suppose a hypothetical result for the worked order reports A as 120 loaded and 0 remaining, B as 70 loaded and 10 remaining, and C as 40 loaded and 0 remaining. The result would contain 230 loaded cartons and 10 remaining cartons. The equality 240 = 230 + 10 is necessary, but it does not by itself validate the placement or constraints.
The loaded gross mass in that hypothetical result would be 1,800 + 840 + 1,000 = 3,640 kg, with 120 kg outside the solution. Recalculate those figures from the cargo records and compare them with the result summary. This example intentionally leaves cargo unallocated to show why unloaded quantities matter. It is not an output from running the LoadVis solver. A real acceptance record should reference the actual calculated plan and its exact cargo revision.
Step 10: separate a planning problem from an input problem
When a result leaves cargo unloaded, first establish whether the input is correct. Verify dimensions, count, mass, orientations, container choice and supported stacking restrictions. If an 80 mm side was accidentally entered as 80 cm, a new solver run will not repair the underlying mistake. Correct the record, explain the correction and rerun the plan so the result and exports all reflect the same data.
If the input is correct, compare operationally available alternatives. Those might include another container type, a different approved packaging arrangement or splitting the order. Change one decision at a time where possible, and preserve the baseline for comparison. Avoid describing a new solution as an improvement solely because it raises volume utilization. A useful alternative should also account for the remaining cargo, handling effort and any constraints that changed between the two versions.
Step 11: prepare the export for a specific audience
Choose the output that supports the next task. A customer may need an overall scheme and manifest to understand the proposal, while the warehouse may need sequence-specific guide views. Include the shipment identifier and plan revision in the handoff message or document naming convention. If several files are exported, make their relationship clear so a guide from an older result is not paired with a newer manifest.
Review the exported document itself, including the item count, container reference and viewing direction. Confirm that text is readable at the scale at which it will be printed or displayed. Compare a representative diagram in the export with the corresponding result screen. Export availability and calculation points belong to the current product plans, so consult the pricing page when selecting the workflow rather than relying on assumptions from an old screenshot or article.
Step 12: agree on what triggers a recalculation
Define which changes invalidate the approved result. Examples include additional cargo, a revised carton size, different palletization, a substitution of equipment or a new orientation restriction. When such a change occurs, update the input and generate a new result. Do not change only a number in the exported document while retaining a diagram based on the previous assumptions. That creates a handoff in which the text and physical arrangement describe different shipments.
Maintain one current approved plan and mark older exports as superseded in the team's existing document process. Ask the warehouse to confirm that the received files match the plan revision before loading starts. If an operator discovers a mismatch on the floor, record the actual package or equipment measurement so the planner can correct the source data. A brief, concrete change record is more useful than a general instruction to be careful.
Step 13: close the loop after the shipment
After loading, record discrepancies that would improve the next plan: inaccurate carton dimensions, packages that could not be stacked as assumed, unclear guide orientation or a loading step that required extra handling. Separate a data correction from an execution observation. The former should update the relevant cargo or container record; the latter may require a new planning assumption or a warehouse procedure.
For the next comparable order, start from confirmed records rather than blindly copying every value from the previous shipment. Recheck quantity, packaging revision and assigned equipment. Use the free calculator for a quick estimate of up to two carton sizes when appropriate, then use the full workspace for larger mixed-cargo arrangements and the guide that will be handed to the warehouse. The objective is a traceable connection between the order, the result and the instructions people actually use.